- If an AI built you a tool as one HTML file, you can put it online for free in about twenty minutes. You do not need to code or pay for hosting.
- This guide covers four free places, in the order I found them easiest to set up: Neocities, Cloudflare Pages, GitHub Pages and Netlify. Netlify is last because I did not test it. Each one has step-by-step instructions below.
- Your file must be named index.html and must hold everything the tool needs, with no extra files.
- Anything you publish is public. Never put an API key, a password or client details in the file.
- If you are a Python person, there is a fifth option for tools that need a back end: PythonAnywhere.
You asked an AI to build you a tool, a checklist or a one-page site, and now you have a file called index.html on your computer. Nobody else can see it yet. This guide shows you four free places to put it online, with every click spelled out, so you end up with a link you can share. Allow about twenty minutes for your first one. Tick off each step as you go: your progress is saved in this browser.
Before you start
Do these five things first. They save you the most common problems later.
Before you publish
- Have one file called index.htmlLower case, ending in .html. If your AI gave you several files, ask it for one (see the box below).
- Open it on your computer firstDouble-click the file. If it opens in your browser and works there, it is ready to go online.
- Check there is nothing private insideNo API keys, passwords, client names or personal details. Anyone with your link can read the page.
- Make sure the content is yours to publishPublish only what you wrote or own the rights to.
- Put the file in a folder on its ownMake a new folder, for example My Tool, and drop index.html into it. Some hosts ask for a folder.
If your AI gave you more than one file, paste this into the same chat:
Please put everything into one file called index.html. Put all the styling and all the code inside that file. Do not use separate CSS, JavaScript or image files. Do not include any API keys, passwords or personal details.
Public means public. All four hosts show your page to anyone with the link, and on GitHub Pages the file itself sits in a public repository. If your tool contains anything you would not put on a noticeboard, take it out before you publish.
Which one should you pick?
All four are free and all four handle one HTML file easily. The differences are in how you upload and what the address looks like.
| Host | How you upload | Your free address | Worth knowing |
|---|---|---|---|
| Neocities | Drag the file into your dashboard | username.neocities.org | Free accounts get 1 GB of storage. Custom domains need a paid supporter plan. |
| Cloudflare Pages | Drag a folder onto a web page | An address ending in pages.dev | Drag and drop allows up to 1,000 files, each up to 25 MiB. A drag-and-drop project cannot be switched to Git later. |
| GitHub Pages | Upload the file in your browser | username.github.io | Free Pages needs a public repository, so the file is visible on GitHub too. |
| Netlify | Drag a folder onto a web page | An address ending in netlify.app | New projects on the Free plan start private, and the plan has a monthly credit limit. See the Netlify section below. |
I have put the first three in order of how easy each one was to set up, easiest first. Never published anything before? Start with Neocities. Cloudflare Pages is a solid choice if you want a big, reliable company behind your page. GitHub Pages took more time to set up than the others, so it suits you best if you already have a GitHub account. Netlify is last because I did not test it, and you can read why in its section.
1. Publish on Neocities
Neocities was the easiest of the four to set up, which is why it comes first.
The simplest option for beginners
- Sign up for freeGo to neocities.org and fill in the sign-up form. The username you choose becomes your address, username.neocities.org.
- Sign in and open your dashboardThis is where your site's files are listed.
- Upload your fileDrag index.html into the file area. If your site already has an index.html, the new one replaces it. You can also open the built-in editor and paste your code in.
- Visit your addressOpen username.neocities.org and refresh the page. You should see your tool.
Neocities hosts static pages only, which is exactly what a one-file tool is. Free accounts have some file type restrictions, but a plain HTML file is fine. Custom domains are part of the paid supporter plan.
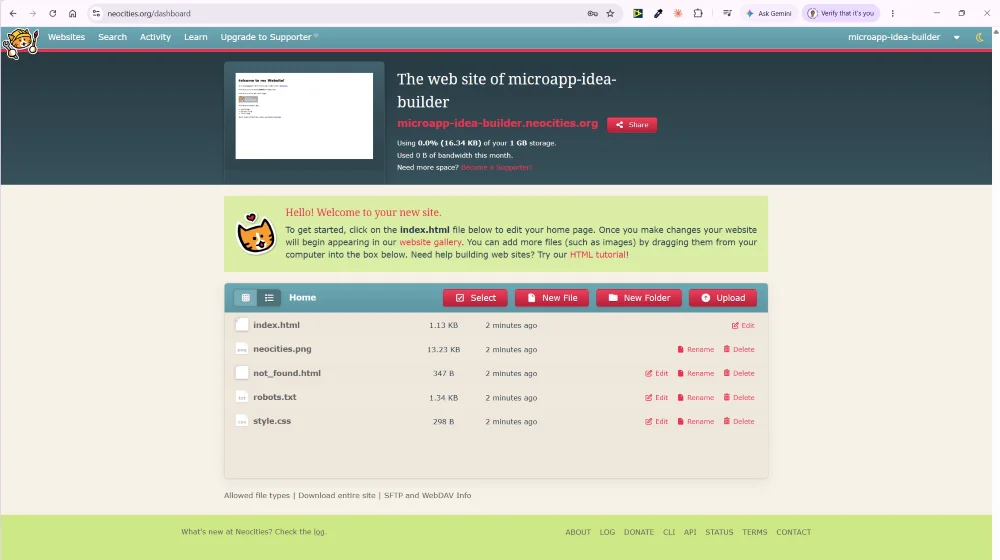
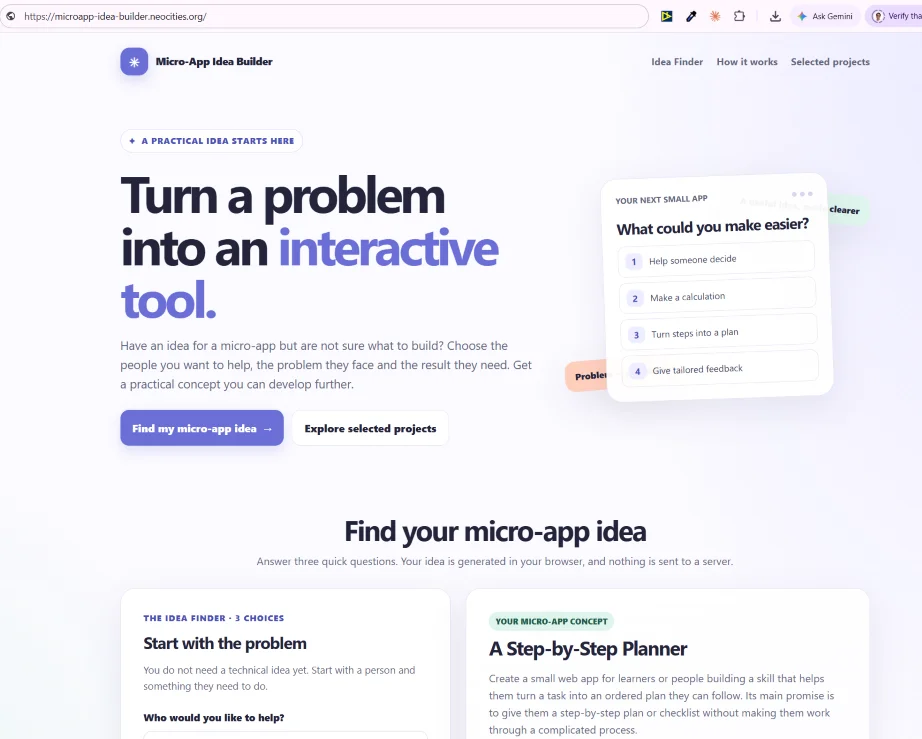
On neocities the finished micro-app is here https://microapp-idea-builder.neocities.org/
The finished micro-app tool looks really good so I had a much better version made for my site Free Micro-App Idea Builder
2. Publish on Cloudflare Pages
Upload your folder in the Cloudflare dashboard
- Create a free Cloudflare accountSign up at dash.cloudflare.com and log in.
- Open Workers and PagesIn the dashboard, go to the Workers and Pages page.
- Choose drag and dropSelect Create application, then Upload your static files, then Drag and drop or select the file from your computer. Name your worker.
- Name your project and drop your folderThe project name becomes your address, ending in pages.dev. Drag in the folder that holds index.html, then select Deploy site. When the upload finishes, select Save and Deploy.
- Open your linkClick on the visit button, open the address and check your tool works. To change it later, select Create a new deployment and upload the updated folder.
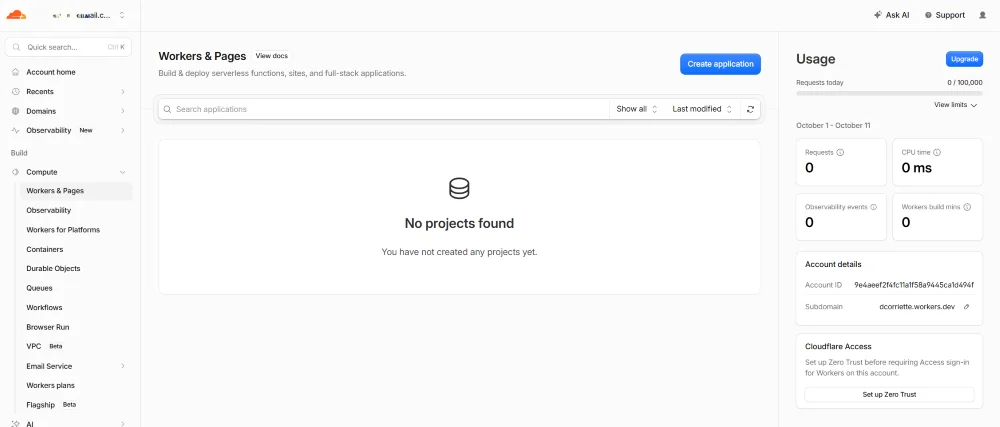
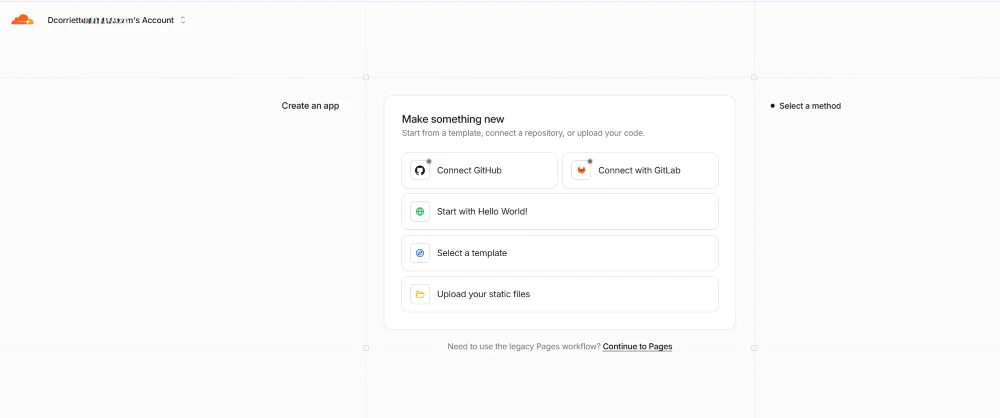
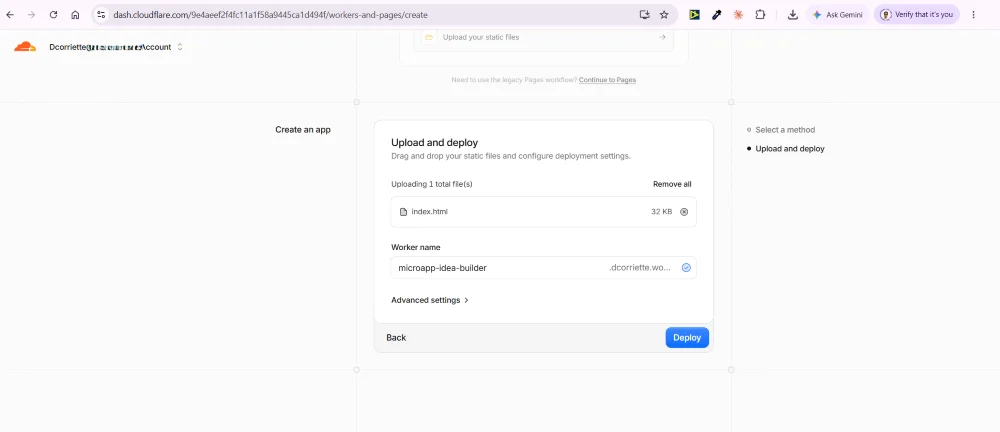
On Cloudflare the link is https://microapp-idea-builder.dcorriette.workers.dev/
3. Publish on GitHub Pages
GitHub Pages is not difficult, but it was more time consuming to set up than the others, which is why it comes third.
Put your file on GitHub and turn on Pages
- Create a free GitHub accountGo to github.com and sign up. Remember your username, because it becomes part of your web address.
- Make a new repositorySelect the plus button at the top right, then New repository. Name it username.github.io, replacing username with your own. Choose Public. Switch Add README on, Leave “Start with a template” set to “No template” and then select Create repository.
- Upload your fileIn the new repository, select Add file, then Upload files. Drag index.html in and select Commit changes.
- Turn on PagesSelect the Settings tab, then Pages in the left-hand list. Under Build and deployment, set Source to Deploy from a branch. Pick the main branch and the root folder, then Save.
- Visit your addressGo to username.github.io, with your own username. GitHub says changes can take up to 10 minutes to appear, so make a cup of tea.
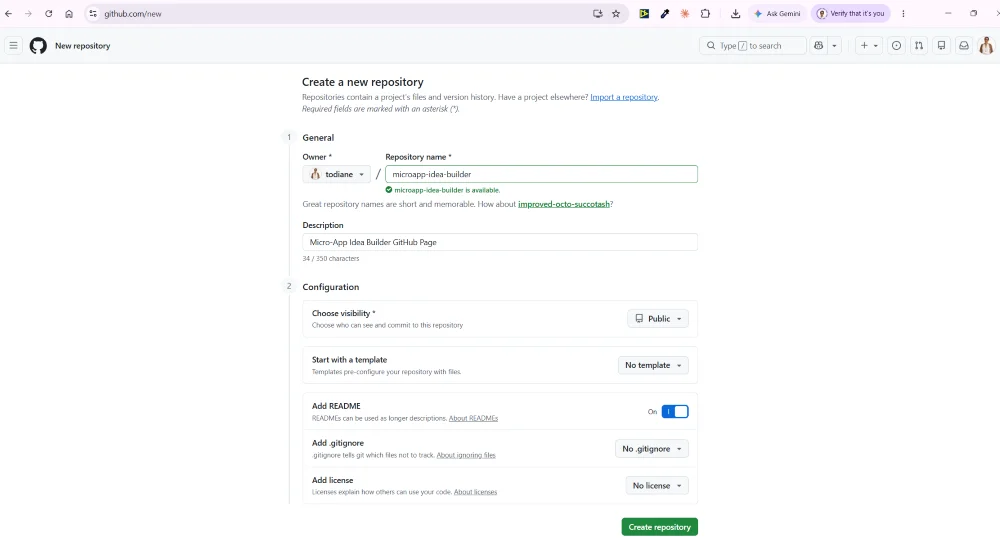
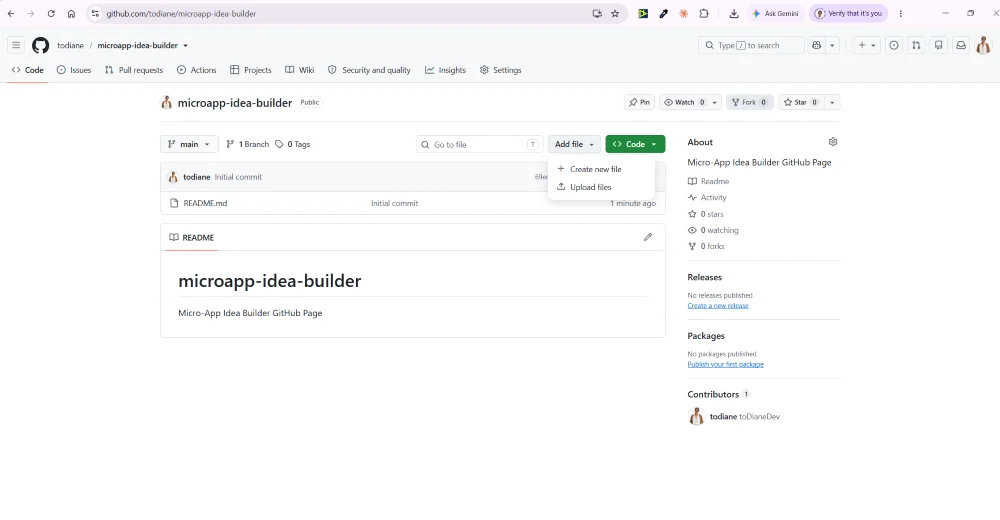
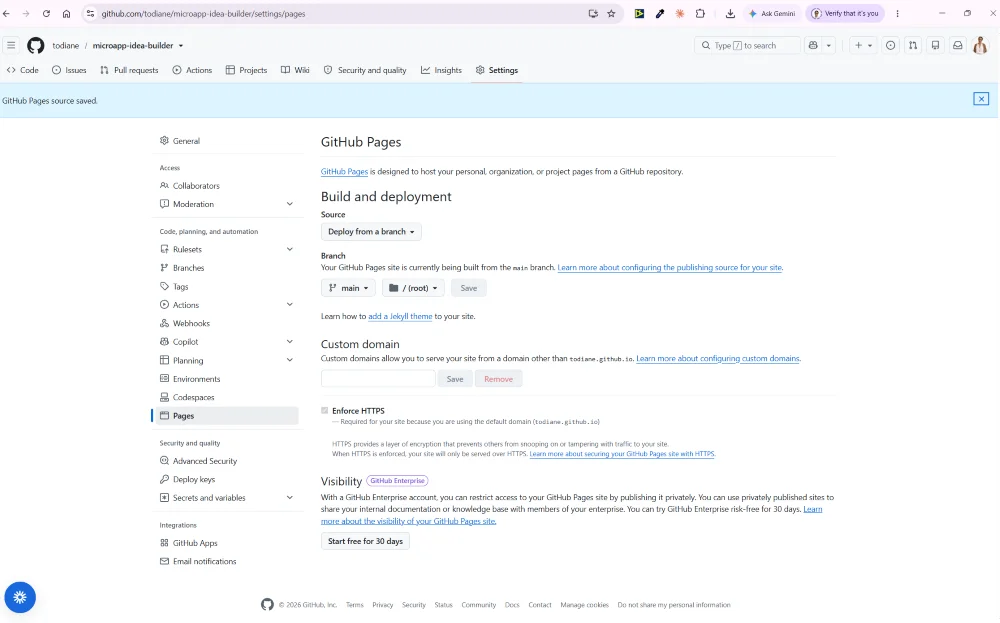
On GitHub the link to my page is at https://todiane.github.io/microapp-idea-builder/
Want more than one tool online? Give each its own repository with any name you like, and turn on Pages in the same way. Each one gets its own address under your username.
4. Publish on Netlify
Netlify changed its defaults in July 2026. New teams on its Free plan now start with projects set to private by default, meaning visitors need to log in to Netlify to access a private site. You must make the project public when you want everyone to access it.
There is a separate restriction: Netlify's Free plan currently includes 300 credits per month. If you exhaust those credits, your projects can pause until the next billing cycle.
I did not publish my page on Netlify, so there are no images for this section. The Free plan runs on 300 credits a month, and I have been in this position before. I used to have a page on Heroku, which offered free credits. Eventually they shut that down and I had to move everything. Even though this is only one page, I would rather avoid doing that again. Neocities was easy enough, so I did not test Netlify, and I have not tried the steps below myself.
Drag and drop your folder onto Netlify
- Create a free Netlify account and log inNetlify says you can drop files without an account, but logging in first means the site is saved to your account and you can update it later.
- Open the drop pageGo to app.netlify.com/drop in your browser.
- Drag your folder onto the Deploy zoneDrag the folder that holds index.html, not the file itself. Netlify publishes it straight away.
- Open your new linkNetlify gives you an address for the site. Click it and check your tool works.
- To change it later, drop the folder againOpen your site in Netlify, go to its Deploys page, and drag the updated folder onto the drop area at the bottom.
A fifth option for Python people: PythonAnywhere
PythonAnywhere runs Python web apps, such as Flask and Django, rather than simple pages. You do not need it for a single HTML file, because the four hosts above are quicker. It matters when your tool needs Python running behind it.
What the free account gives you
- One web app at username.pythonanywhere.com
- 512 MiB of disk space
- No customer support on the free plan
What to watch for
- A free web app expires after one month, so you log in to keep it running
- Outbound internet access from free apps is restricted
- More setup than the four hosts above
If that sounds like your kind of project, start with PythonAnywhere's own help pages, linked at the end of this guide.
After your tool is live
- Test it on your phone. Open the link on your phone as well as your computer. Fix anything that looks squashed by asking your AI to make the page work on small screens.
- Update it by uploading again. Use the same file name, index.html, and the host replaces the old version.
- Know where answers are saved. A one-file tool usually saves what people type in their own browser. It does not follow them to another device, and you cannot see their answers.
- Keep a copy. Store your original index.html somewhere safe. The host is not your backup.
Troubleshooting
I see a 404 or a page not found message
Check the file is named exactly index.html, in lower case, and is not called index.html.txt. Check it sits at the top level of your folder, not inside another folder. On GitHub Pages, wait up to 10 minutes and try again.
The page is blank or looks half built
Open the file on your computer first. If it works there but not online, the tool probably relies on another file the AI did not include. Use the single-file prompt near the top of this guide.
I changed the file but the old version still shows
Upload the file again with the same name, wait a minute, then refresh the page with Ctrl and F5 together. On GitHub Pages it can take up to 10 minutes.
My answers disappear when I use another device
That is normal for a one-file tool. It saves in the browser you used. Saving across devices needs an account system, which is a bigger project than a single page.
Can I use my own domain name?
Some hosts allow it, but that is a separate job. On Neocities a custom domain needs the paid supporter plan.
Is it really free for good?
These were free options when this guide was last updated on October 11, 2026. Plans change, so look at each host's pricing page before you rely on one.
When you want it on your own site
A free host is a good place to start, and it costs nothing to try. If the tool becomes part of your business, you may want it sitting on your own domain, under your own branding, next to your products and your audience. That is not free, but it is the next step up.
A Djangify shop can host interactive tools as Hosted Tools, either free for everyone or paid and linked to a product. The tool lives on a shop you own, so there is no host to outgrow. Read Hosted Tools: Free and Paid Interactive Tools to see how it works.
- Get one file called index.html, open it on your computer, and check it holds nothing private.
- Neocities: sign up, then drag index.html into your dashboard. It was the easiest to set up.
- Cloudflare Pages: drag your folder onto a web page.
- GitHub Pages: upload the file to a public repository named username.github.io and turn on Pages. It took more time than the first two.
- Netlify: drag your folder onto a web page and make the project public so everyone can see it. I did not test this one.
- PythonAnywhere is for tools that need Python behind them, not for a single page.
- When the tool becomes part of your business, a Djangify shop can host it on your own domain.
This page was built with Interactive Content Blocks
The stats bar, guide trackers and checklist on this page come from Interactive Content Blocks, a set of seven ready-made blocks for your own pages. Ticks and progress are saved in the reader's own browser. The set includes an AI skill file, so any AI assistant can add the blocks for you.
See Interactive Content Blocks →